


Integrated Resources and Information Sharing (IRIS), NITK is a student-managed digital university management portal which ensures that all the administrative, academic, and alumni-related procedures take place methodically.
Logging In
1st-year students will receive Login credentials for IRIS, NITK via email.
Logging in to IRIS:
- Use the Username/Email and Password to login to IRIS Account
- You can also use Sign in with Google or Sign in with Microsoft to login.
- On your first sign-in, you will be prompted to accept the Data Protection Policy. Accept the policy using the button at the bottom of this page. (This step would have probably been completed at the admission help desk)

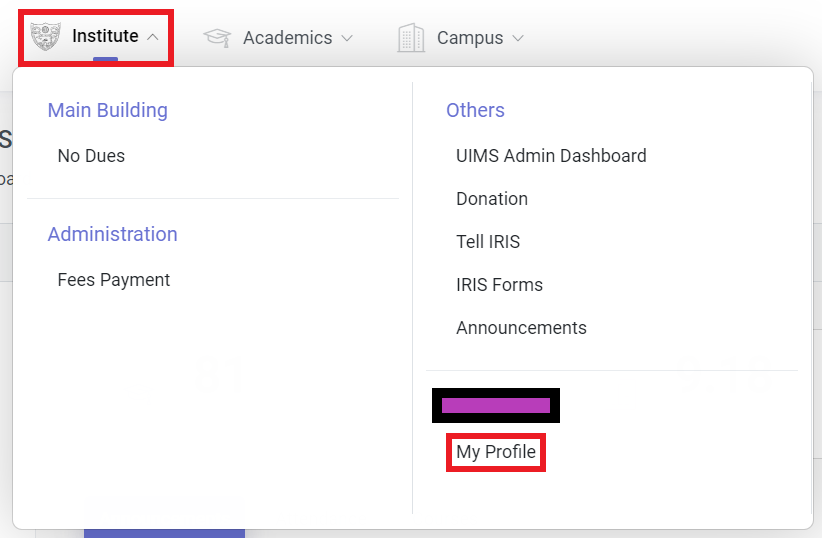
My Profile
Access My Profile:
- At the top right corner of the IRIS Dashboard, click on your profile picture. From the drop-down, select “Profile”.
- You can also access your profile from the IRIS home page by going to the “Institute” tab in the navigation bar on top and then clicking on “My Profile”
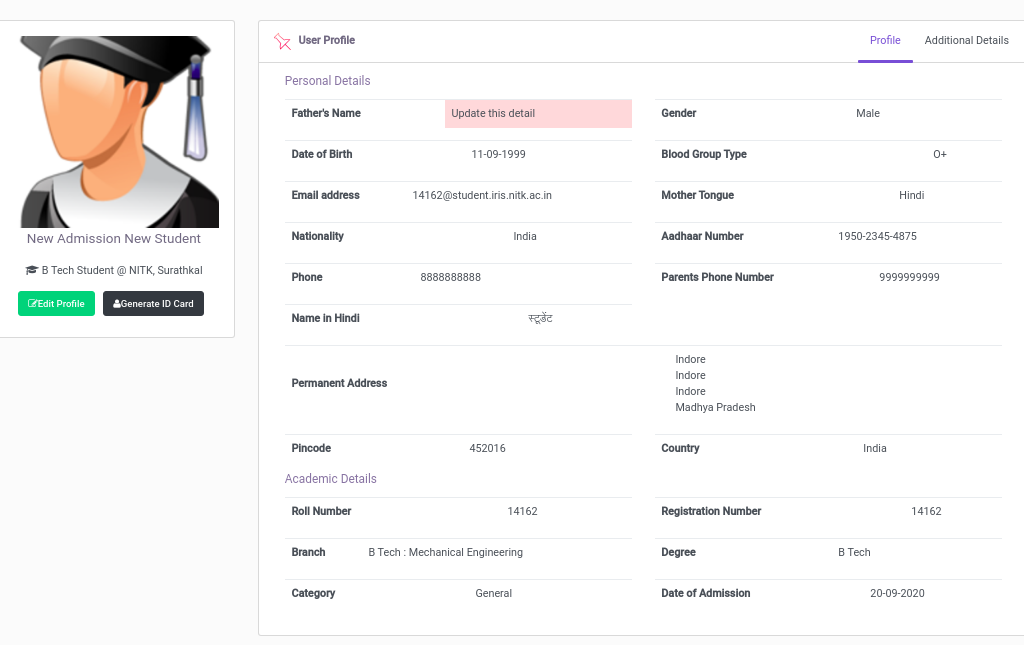
Components:
- The My Profile screen will contain information such as Name, Nationality, Branch, Minor program, etc.
Sample My Profile Page
- You can click on “Edit Profile” to update any incorrect information.
- Important: You will not be able to change some of the fields like Date of Birth. For getting these details updated, please contact the MIS office with relevant reasons and proof of the information through either of the following means:
- Create a Tell IRIS Ticket, or
- Send an email to misofficer@nitk.edu.in
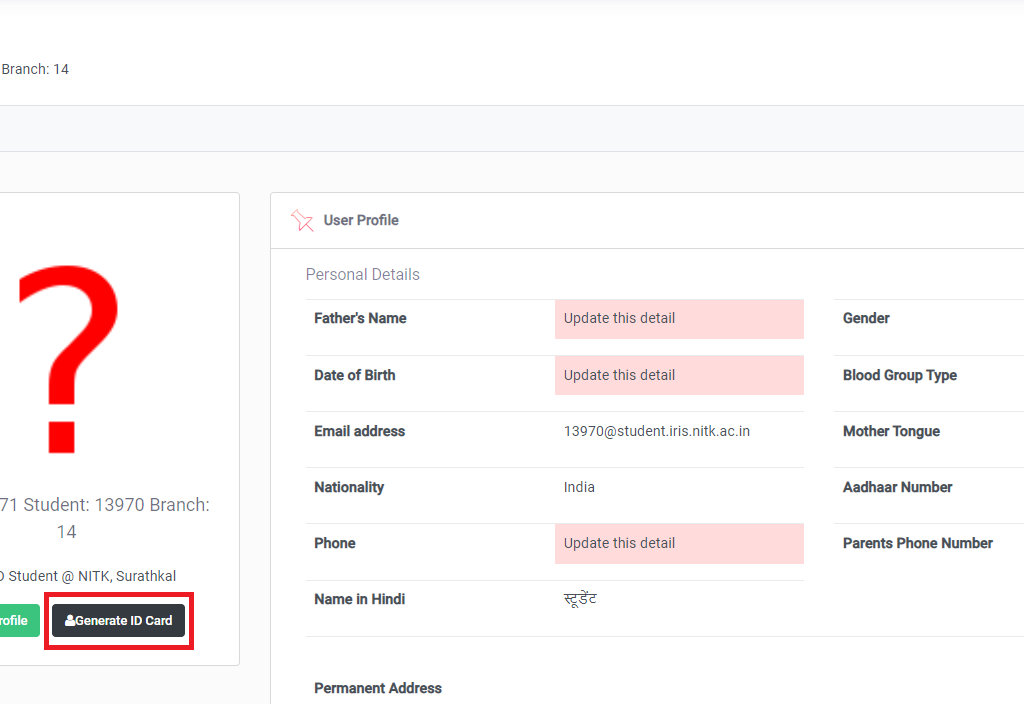
ID Card Generation
- After filling in the required information in My Profile and getting a Roll Number assigned by the Academic Section of the Institute, you will be able to generate an ID card by clicking on the button shown.
- As per institute policy, ID cards can be generated directly by the student only until the end of first semester. In case there is a need to generate the ID card in a higher semester, kindly contact the MIS office.
EDU Accounts and Microsoft Teams
You can create your NITK EDU Account and Microsoft EDU Account once the Academic Section of the Institute allots you a Roll Number.
NITK EDU Account:
- NITK EDU Account is a G Suite Education account that provides many features for educational usage. More details: Link
- Creating NITK EDU account:
- Go to My Profile and select “NITK.EDU.IN Account” from the left sidebar
- Choose a prefix for your new G Suite Email-id. Kindly note that once a G Suite email ID has been created, you will not be allowed to change the prefix in the future. Hence, kindly ensure that you have typed in the desirable prefix in the given text box. It is advisable to use a prefix that consists of your first name, a prefix that is short and suitable for all future professional communication purposes through email.
- Once you click on “Create NITK.EDU.IN Account”, a temporary password will be shown. Now, visit google.com and sign in using this email-id and temporary password.
- You can now use G Suite services with this account.
- Passwords can be reset for the NITK EDU Account using the same page or from Google Account Settings.
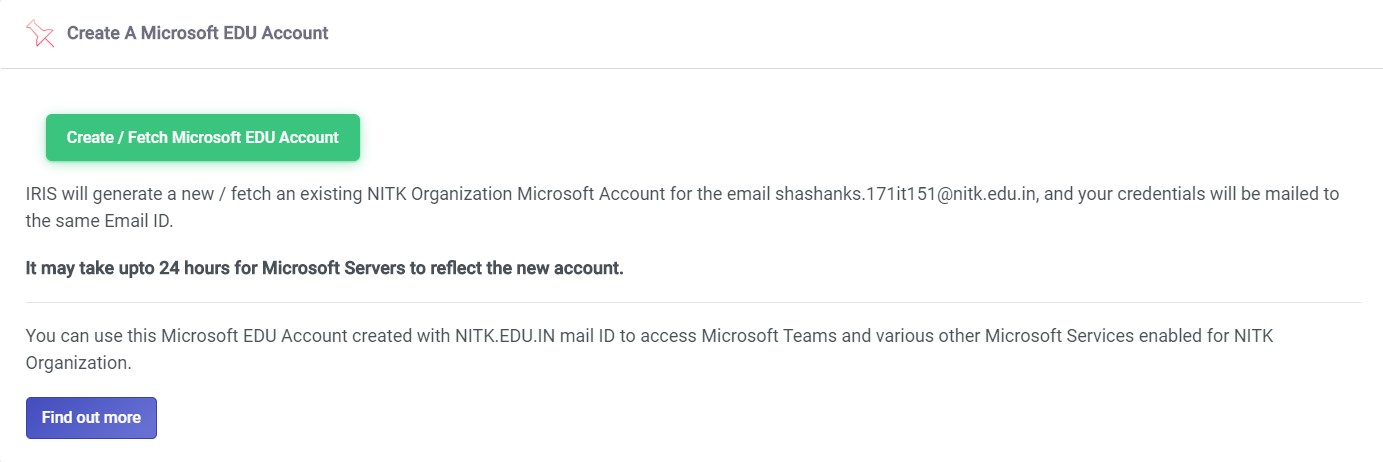
Microsoft EDU Account:
- Microsoft EDU Account is a Microsoft 365 A1 Account for educational purposes. More details: Link
- To create a Microsoft EDU Account, you should first create a NITK EDU Account, as mentioned above.
Creating Microsoft EDU account:- Visit “My Profile” and select “Microsoft EDU Account” from the left sidebar
- Click on “Create/Fetch Microsoft EDU Account”.
- Once you click on Create Microsoft EDU Account, a temporary password will be mailed to your NITK EDU Gmail Account. Now, visit office.com and sign in using this email-id and temporary password and set the password.
- You can now use Microsoft 365 A1 services.
Important: Passwords can be reset for Microsoft EDU Account only via this page. It cannot be reset from Microsoft’s end.
- Microsoft EDU Account provides access to Microsoft Teams.
Course Registration
- Course Registration is a routine academic activity that is carried out at the beginning of every semester.
- Mandatory Courses pertaining to core requirements will automatically be uploaded onto the IRIS website. You only need to confirm the registration and need not select them separately.
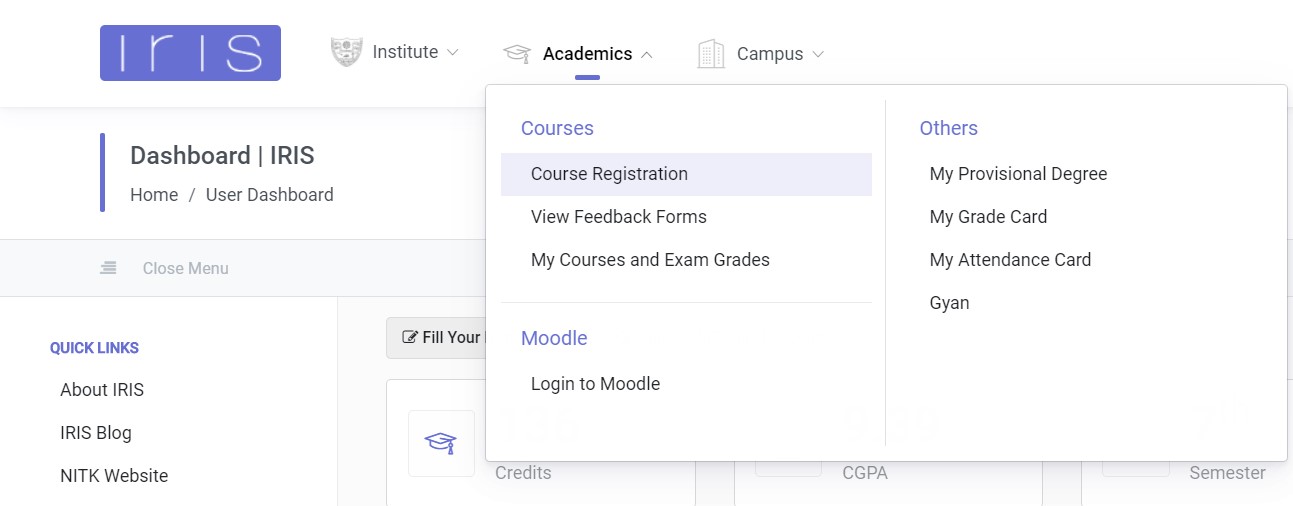
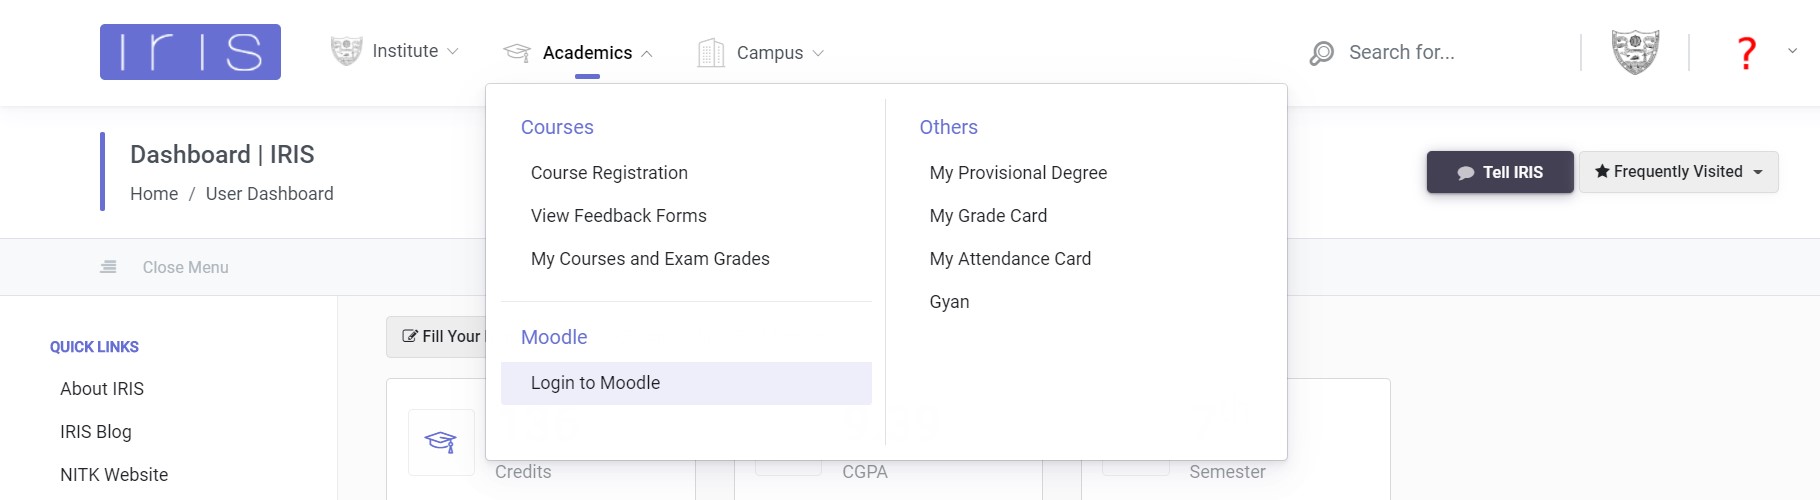
- To access course registration, you must follow the given steps – once you open IRIS, go to the navigation bar on top and click Academics → Courses → Course Registration.
- If the date for course registration has not yet been reached, a message saying ‘Course Registration Is Unavailable To You Currently.’ will be displayed.
- Once the Course Registration commences, mandatory courses will be prefilled in the list, while the elective courses which the student wishes to enroll in will have to be selected from the dropdown.
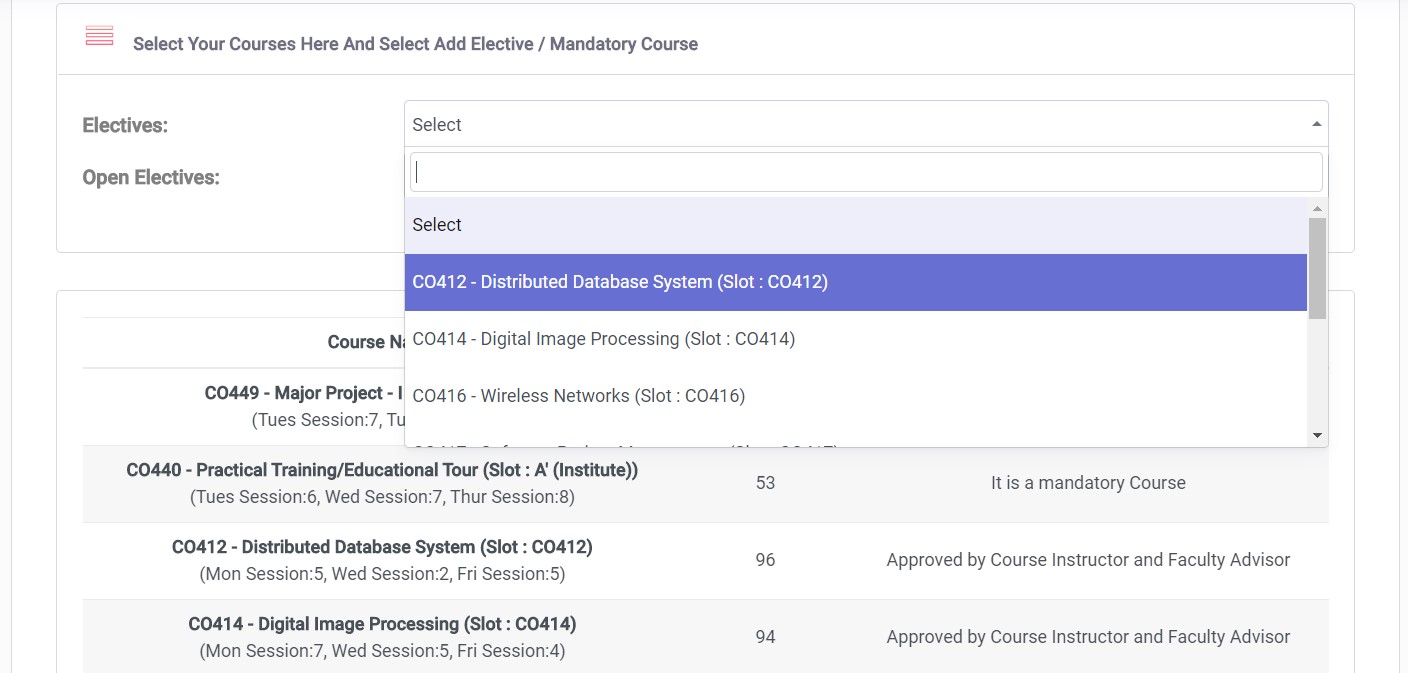
- Once this has been done, click the register button at the bottom of the screen. This will ensure that the course has been registered. ( Note. It is advised that you register for courses immediately, as once new courses are introduced, clicking on the ‘register’ button will not affect those which you have already registered for.)
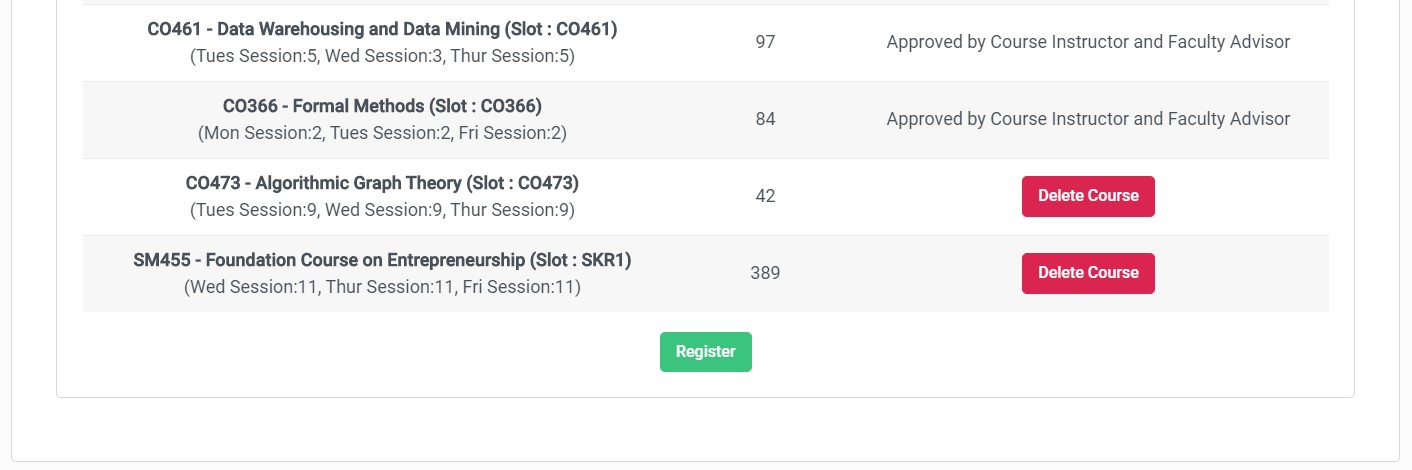
- Once you have finished registration and the course has been approved by both the course instructor and the faculty advisor, you can view the courses in the Academics → Courses → My Courses and Exam grades.
Note: Students should click on “Register” at least once before the Course Registration ends to register for both the Mandatory and Elective (if applicable) courses. If there is an addition of a new course in your course registration list shown above, click on “Register” again.
Moodle and BBB (Big Blue Button)
Recorded Lectures, notes, assignments, and examinations for registered courses can be accessed on Moodle.
Accessing Courses :
- To access Moodle, log in to your IRIS account, go to the top bar, and click Academics → Moodle → Login to Moodle.
- A course will be available on Moodle only after course registration has been done on IRIS and both the course instructor and faculty instructor have approved the course for a particular student.
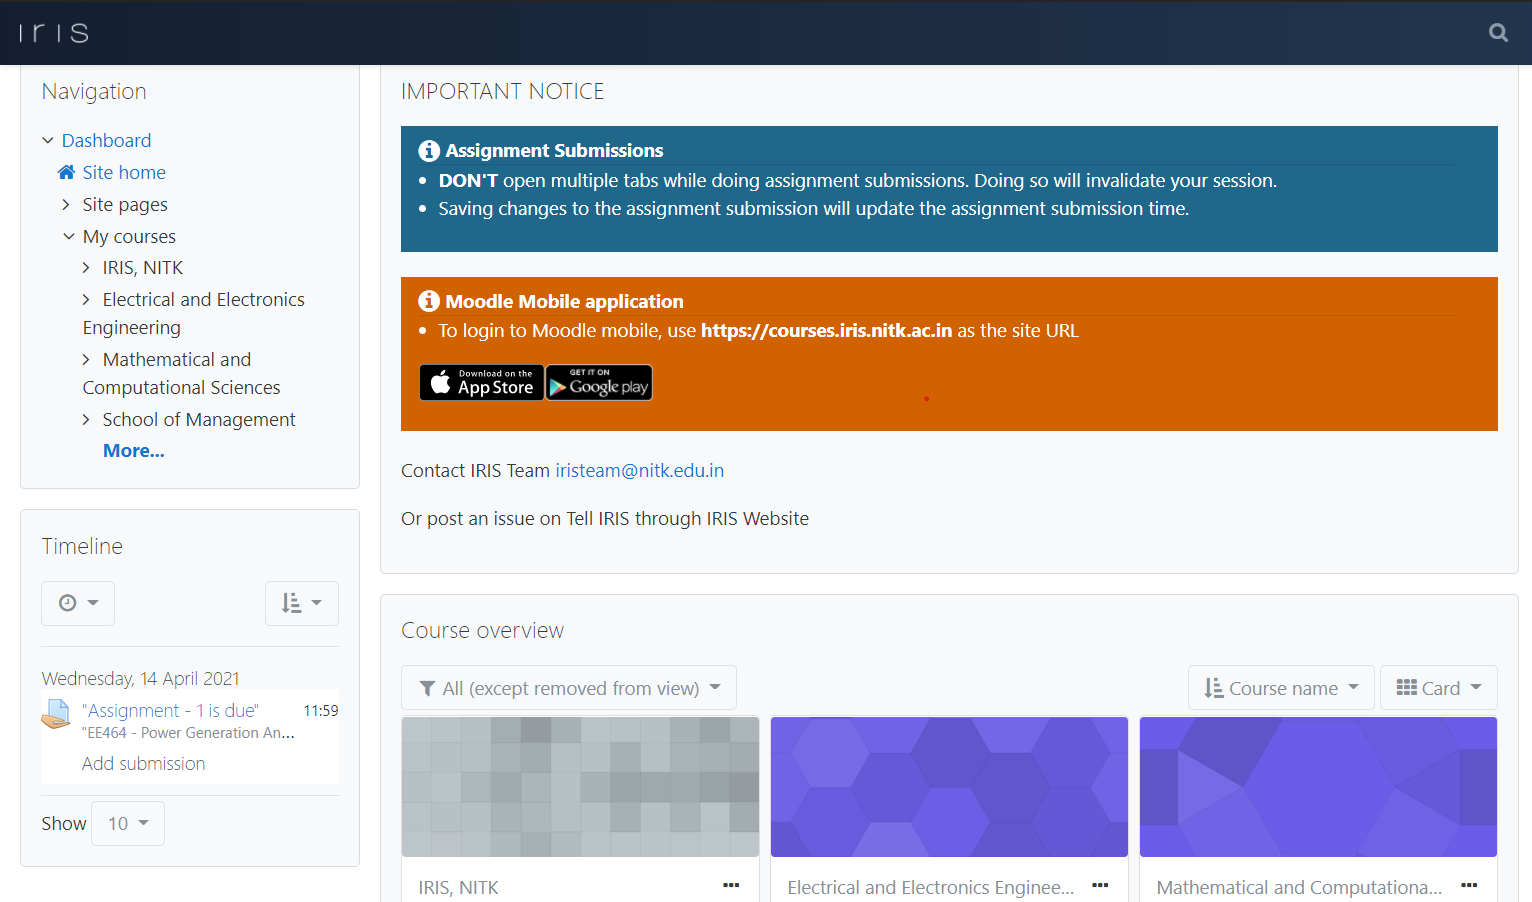
- Once you arrive at the Moodle home page, your courses will be listed on the left side of the page and on the bottom half. They will be listed department-wise. Also, a calendar of events will be visible to you. This calendar is located at the bottom right of the page.
- To access a course, you must click on the link (course name). This will redirect you to the course page on Moodle.
Watching BBB Lectures
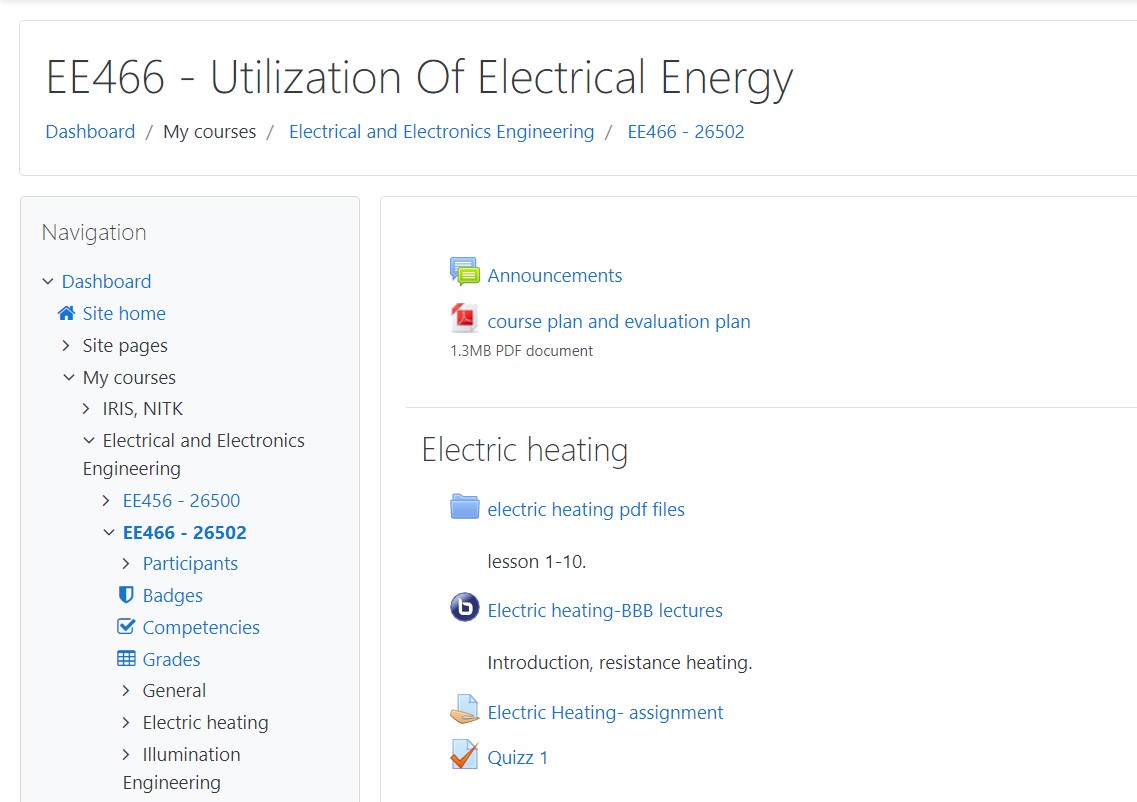
- Once a course lecture has been uploaded, you can view it by clicking on the BBB link on the Course Page provided. (Note: Faculties may not upload recorded lectures on BBB regularly for all courses. Students can access BBB lectures if uploaded by faculties.)
- Once this is done, you will be redirected to a page with details like the lecture name, date, and duration.
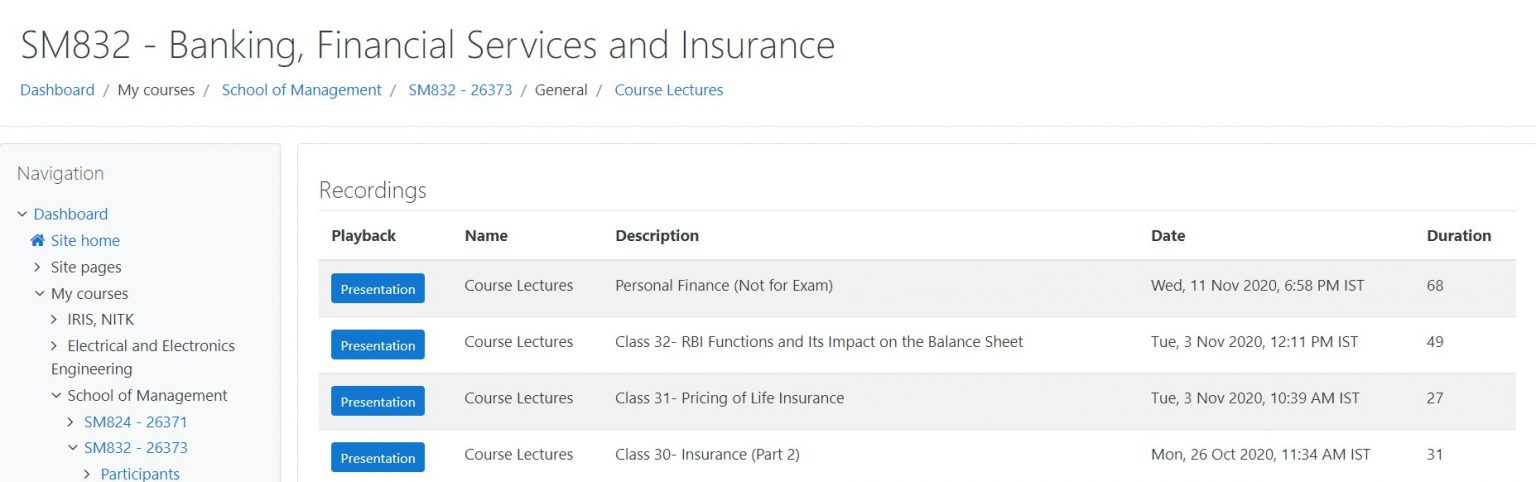
- Clicking on the blue-coloured “Presentation” button will open a new tab with the audio lecture.
- Lectures can be viewed at varying speeds – 0.25x , 0.5x , 0.75x , 1x , 1.25x and 1.5x. The slides can be viewed individually as well.
Accessing Course Reference Material
- Course reference material such as PDF documents, Powerpoint presentations, research articles, notes, formula sheets, etc., may be uploaded by course instructors on Moodle. These reference materials can be downloaded from the course page.
Courses, Marks and Grades
Overview:
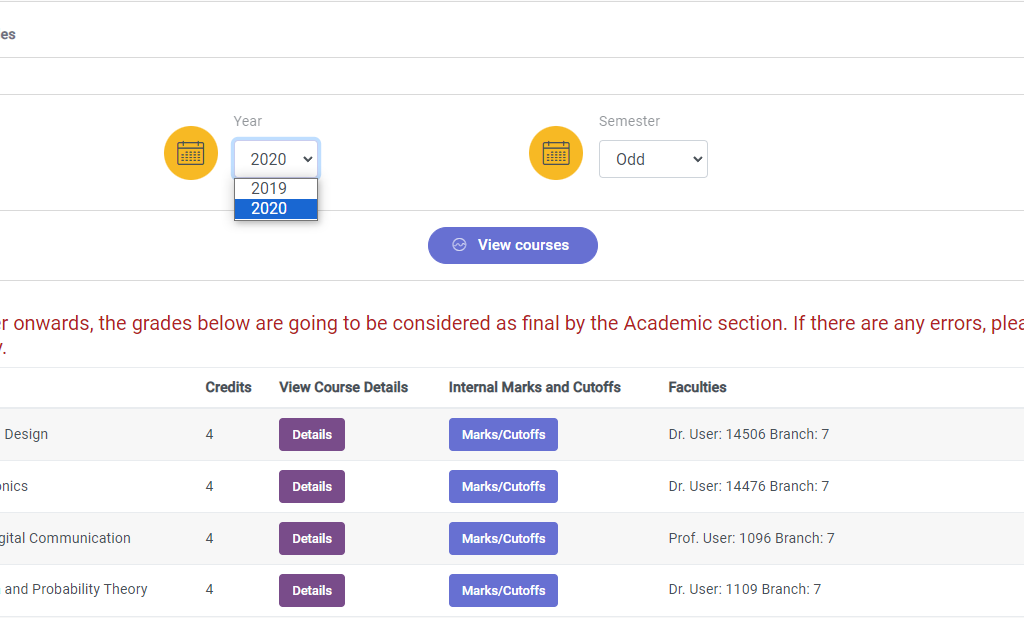
- “My Courses and Exam Grades” is a module that allows for IRIS users to view the grades for the courses that they have been enrolled in and are eligible for grading.
- Browse to: https://iris.nitk.ac.in/hrms/courses/my_courses
- You can find “My Courses and Exam Grades” under the Academics tab in the User Dashboard.

- Your grades will be displayed in “My Courses and Exam Grades” once the respective professors have updated the marks and the cutoffs based on the various grades that have been decided by the respective departmental panels. It must also be noted that you can only view your grades after the Feedback Form for the respective courses have been filled.
- Grades for previous semesters can also be viewed by changing the Year and Semester and clicking View courses.
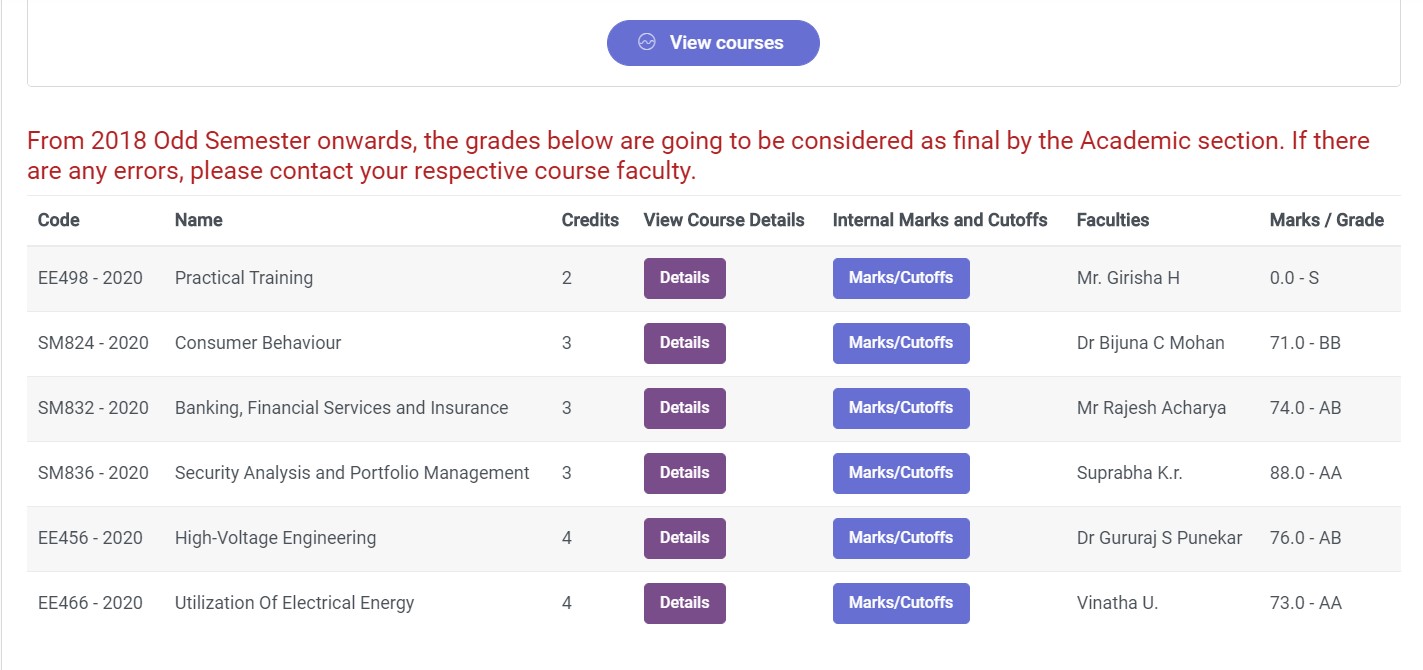
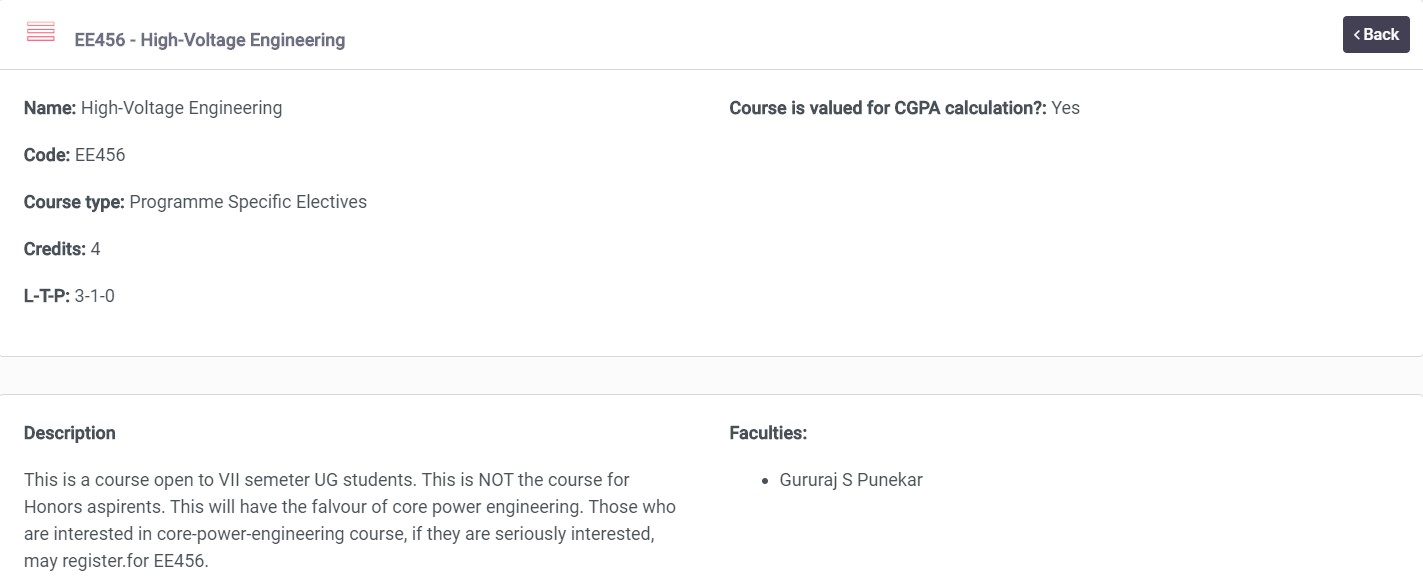
View Course Details
Under Details, you will be able to view specific details with respect to the course, such as Course Code, Course Type, Credits, Distribution of hours throughout the week (between lectures, Tutorials, and Practicals), and whether the course is valued for CGPA calculation.
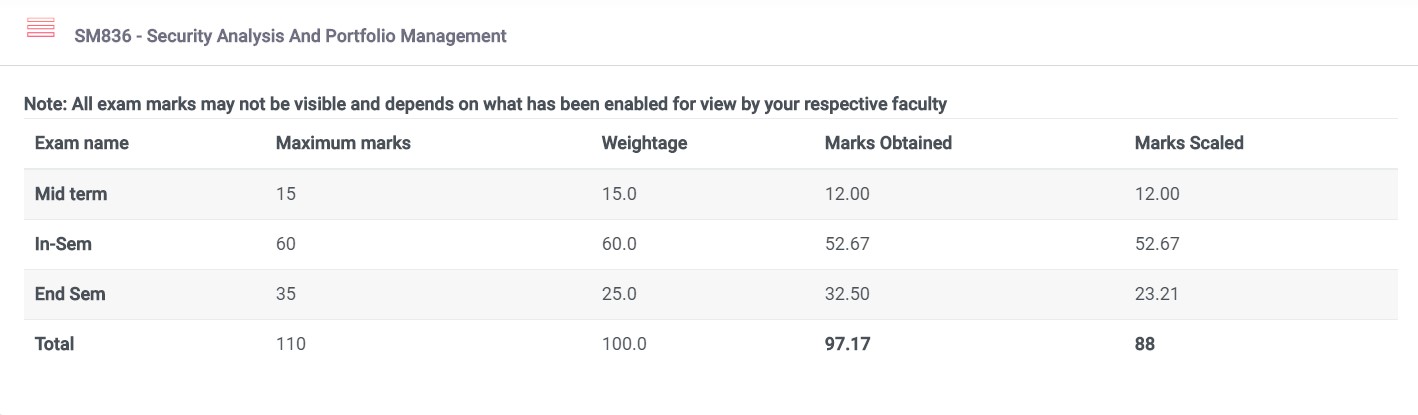
Internal Marks and Cutoffs
By clicking on the “Marks/Cutoff” button in the “My Courses and Exam Grades” page, you will be able to view the distribution of marks in accordance with the course plan and the respective weights of each of the assignments, quizzes, Mid and End Semester examinations, and the final total.
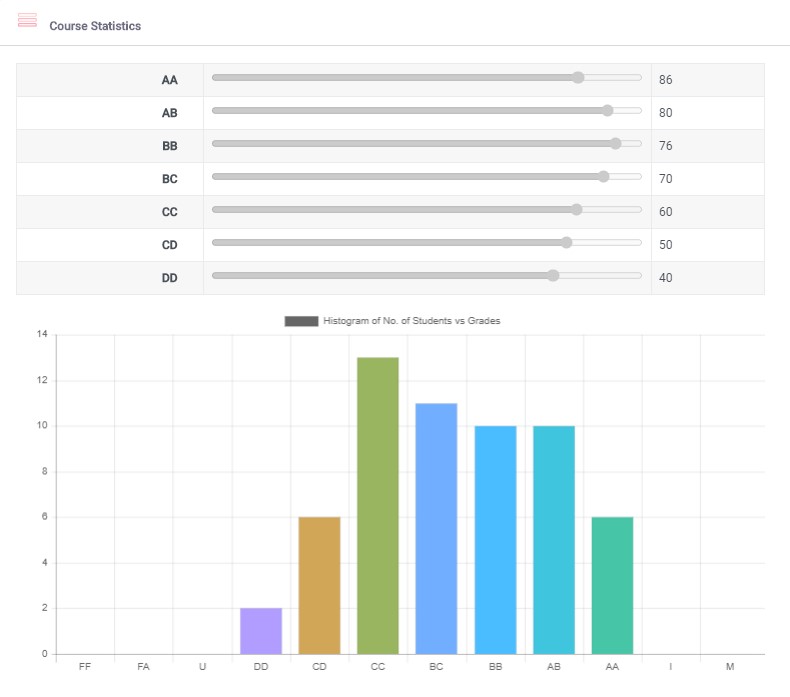
Course Statistics:
Under Course statistics, you will see the cutoffs for the grades and a histogram of the distribution of the number of students for each grade.
Feedback Forms
At the end of every semester, the institute collects feedback regarding the courses completed in the current semester from the students.
- The feedback forms can be accessed through Academics → View Feedback Forms
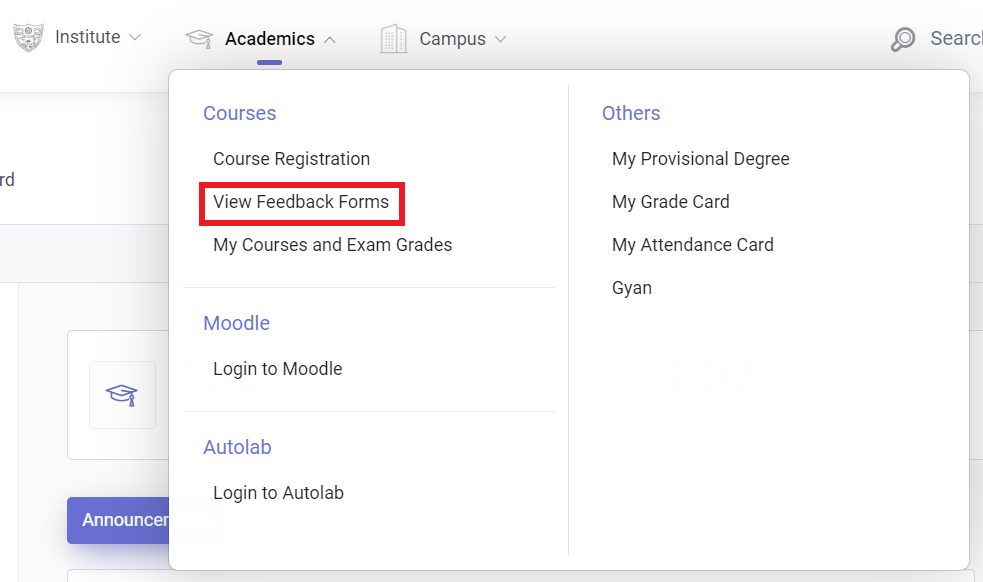
- These forms shall be made available just before grades display.
- It is mandatory to fill the feedback forms to view the grades obtained.
- The feedback forms would have to be filled for all the mandatory courses and elective courses (if applicable)
- The form responses cannot be edited once submitted.
- The form responses are completely anonymous.
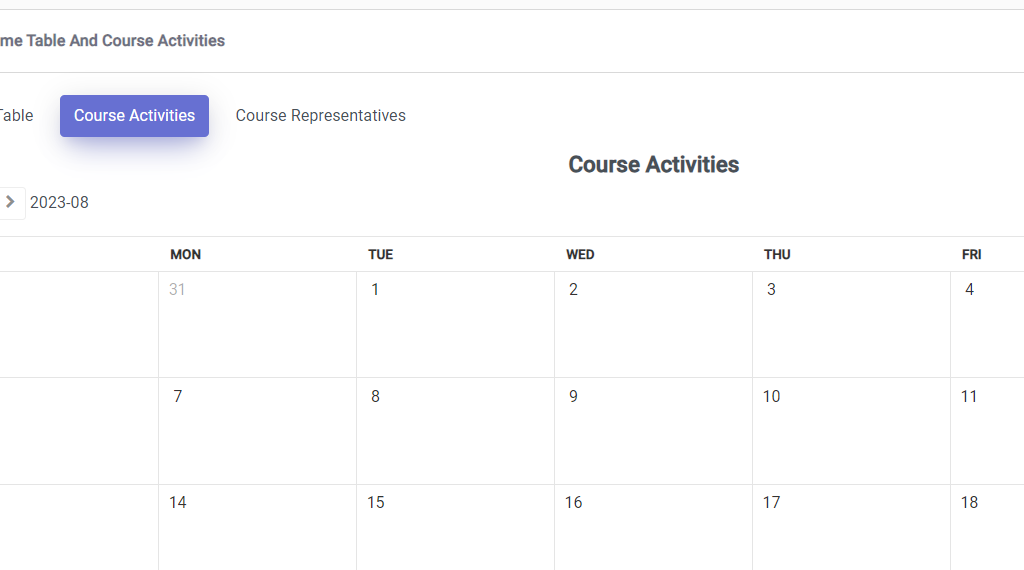
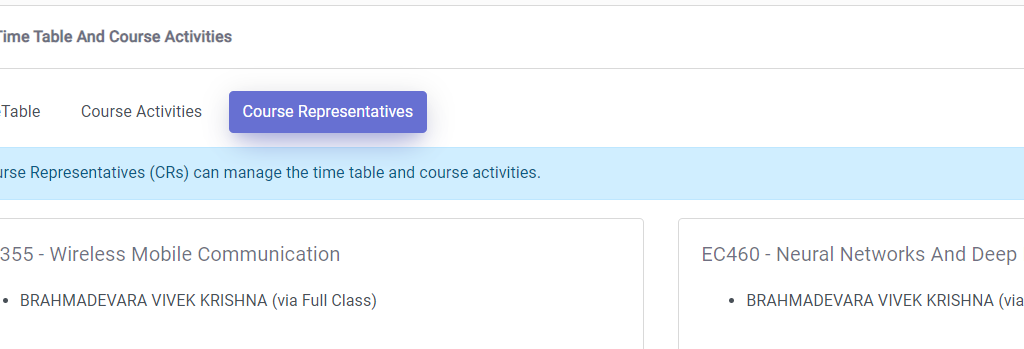
My TimeTable
The TimeTable module showcases the dynamic timetable of a class. The module will display the current schedule and the changes made to it, which might be either temporary or permanent.
- It can be accessed through Academics → My Timetable

2. A calendar view of the classes can be seen in the TimeTable tab.
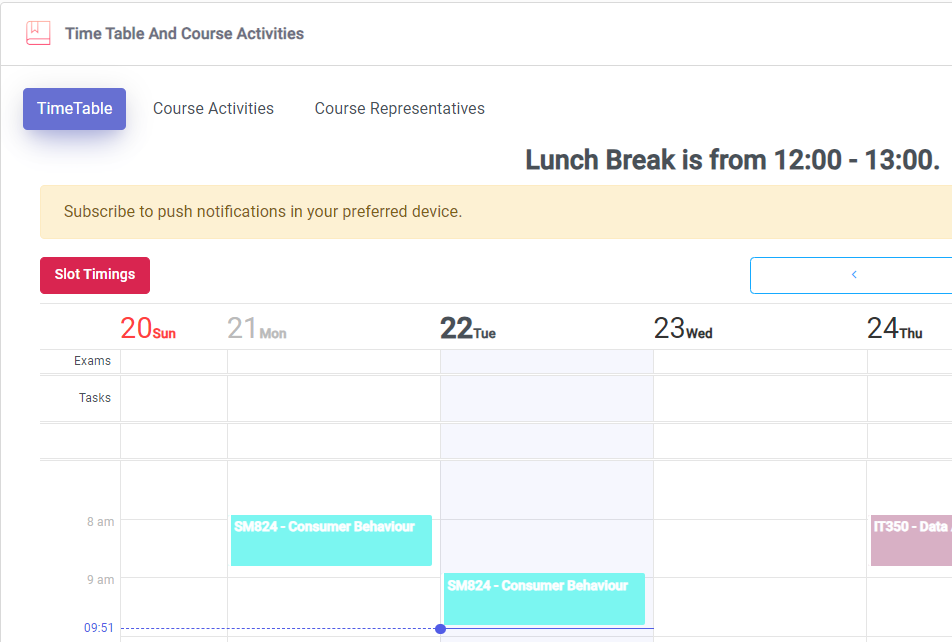
3. The course activities that are updated by the CR can be viewed in the Course Activities Tab.
4. Information about the CRs of each course can be viewed in the Course Representatives Tab.
5. Subscribe to push notifications to receive the latest updates.
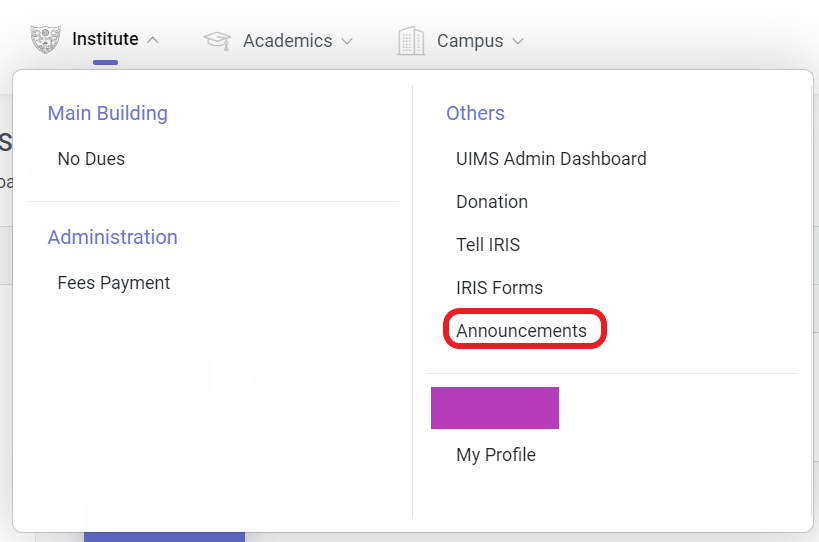
Announcements
All the important institute-related announcements shall be made available in IRIS. These could include notices about scholarships, important surveys, IRIS-related announcements, etc.
- The announcements can be directly accessed from the dashboard.
- The announcements will be visible in the dashboard only for a few days.
- However, past announcements can be accessed through Institute → Announcements
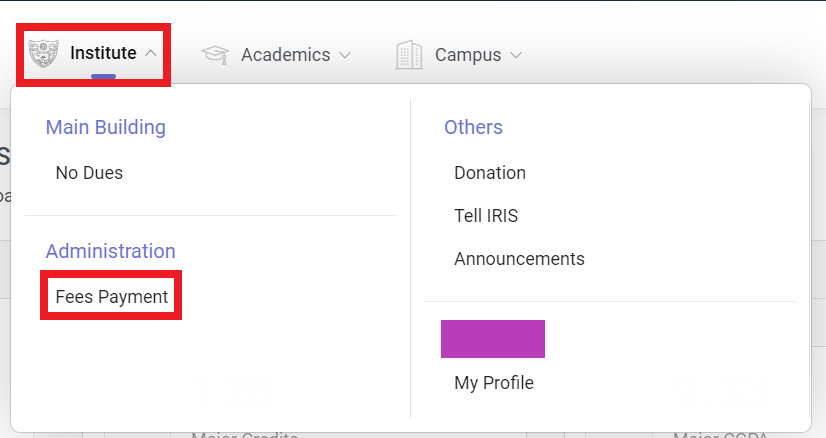
Fee Payment
- The College/Institute Fee payment and the Hostel Fee payment are routine activities that take place at the beginning of every semester.
- Click on the “Institute” tab in the navigation bar on top and click on “Fees Payment” under the Administration section of the dropdown.
- The college fee and institute fee details will be shown for the upcoming semester.
- There are three ways to proceed with the fee payment procedure: online transaction using our payment gateway, submitting a loan undertaking and submitting offline transaction (transactions that take place outside IRIS) details. Detailed information and instructions regarding the fee payment process will be given by the MIS Office at the beginning of every semester through the IRIS Announcements module.
Hostel Module
- Students have the option of booking their hostel rooms and messes from the IRIS Hostel module.
- Detailed instructions regarding the room and mess allocation procedure at the beginning of every academic year/semester or at any intermediate point of time shall be given by the Hostel Office.
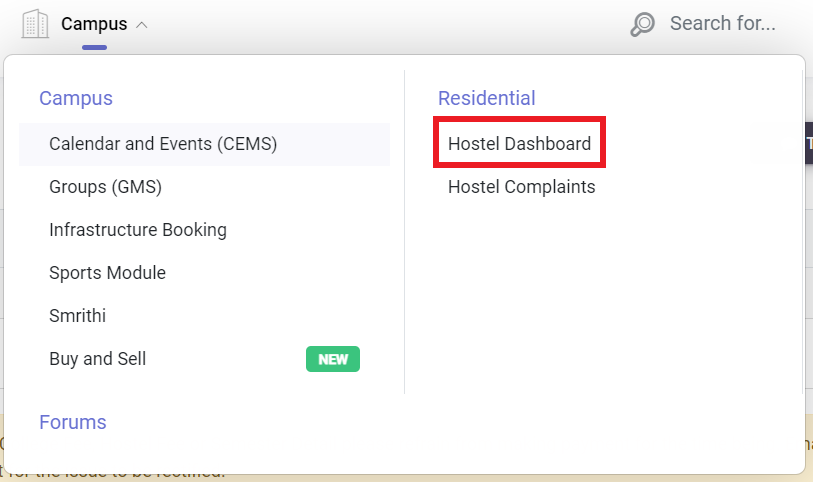
- The hostel dashboard can be accessed by clicking on the “Campus” dropdown in the navigation bar on top and then clicking on the “Hostel Dashboard” option under the “Residential” section.
- For more detailed instructions and guidance regarding the usage of the hostel module to book your rooms and messes, kindly refer to the module user manual here.
Calendar and Event Management
The CEMS Module, nested under the Campus tab on the IRIS Dashboard, is designed to provide information about events happening in the college at a glance, be it workshops, seminars or KEPs, as well as events by various clubs and organizations present on-campus.
Main Calendar
Various calendars are featured under the Main Calendar tab.
By default, your calendar overview displays My Events which is the subscribed feed. To subscribe to calendars, navigate through the List of Calendar Subscriptions and select the calendars that you would like to stay updated with and subscribe to.
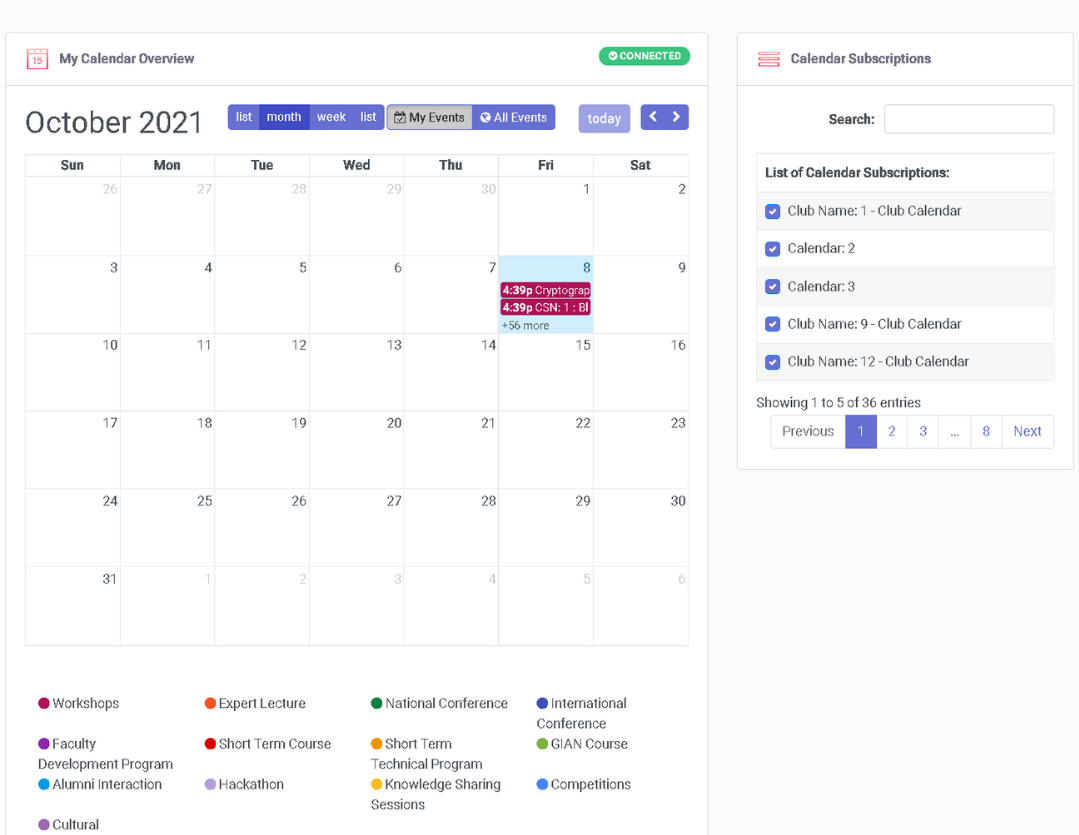
To view events from all clubs and groups, select All Events. This is the global feed.
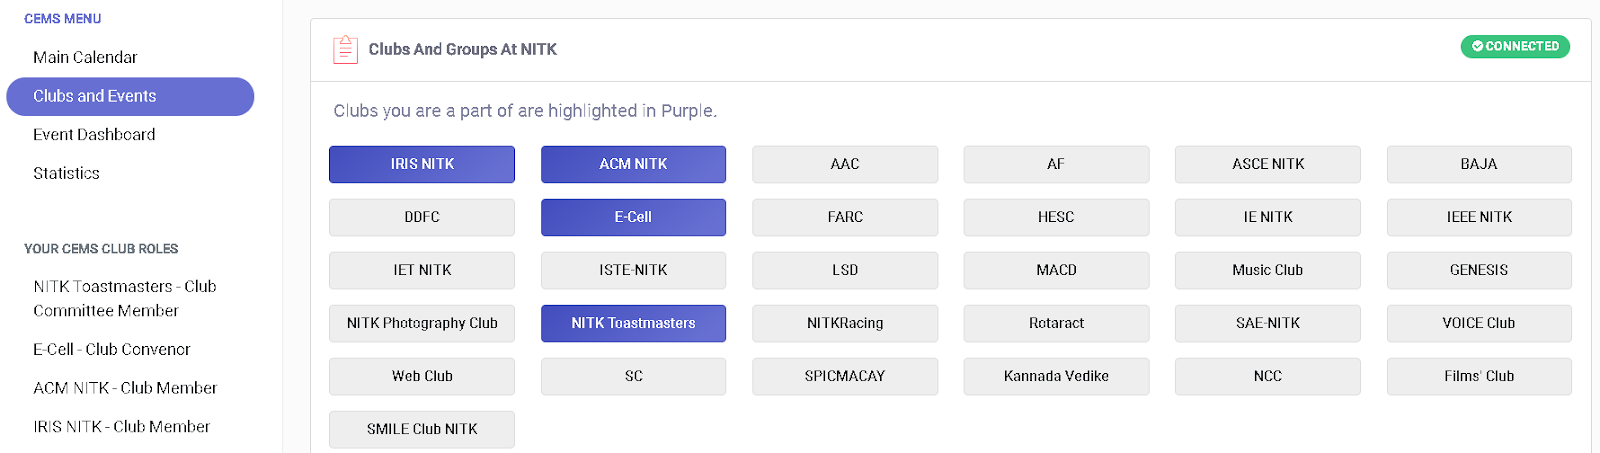
Clubs and Events
A list of clubs with their members and other club details are displayed under this tab. The clubs that you join as a member will be highlighted in purple.
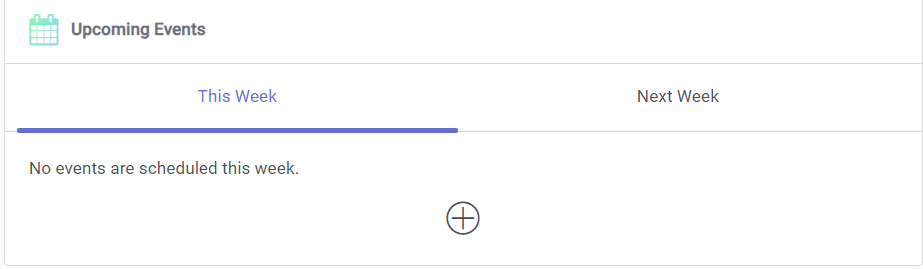
Calendar Widget
To stay updated on events of your choice without navigating to CEMS each time, there exists an easy-to-access widget on your IRIS Dashboard under the Announcements tab. You will only be able to view upcoming events of clubs and groups that you have already subscribed to. To manage your club subscriptions, click on the plus button on the widget and follow the steps mentioned above to subscribe to your favourite clubs and groups.
A complete and more detailed guide can be found here.
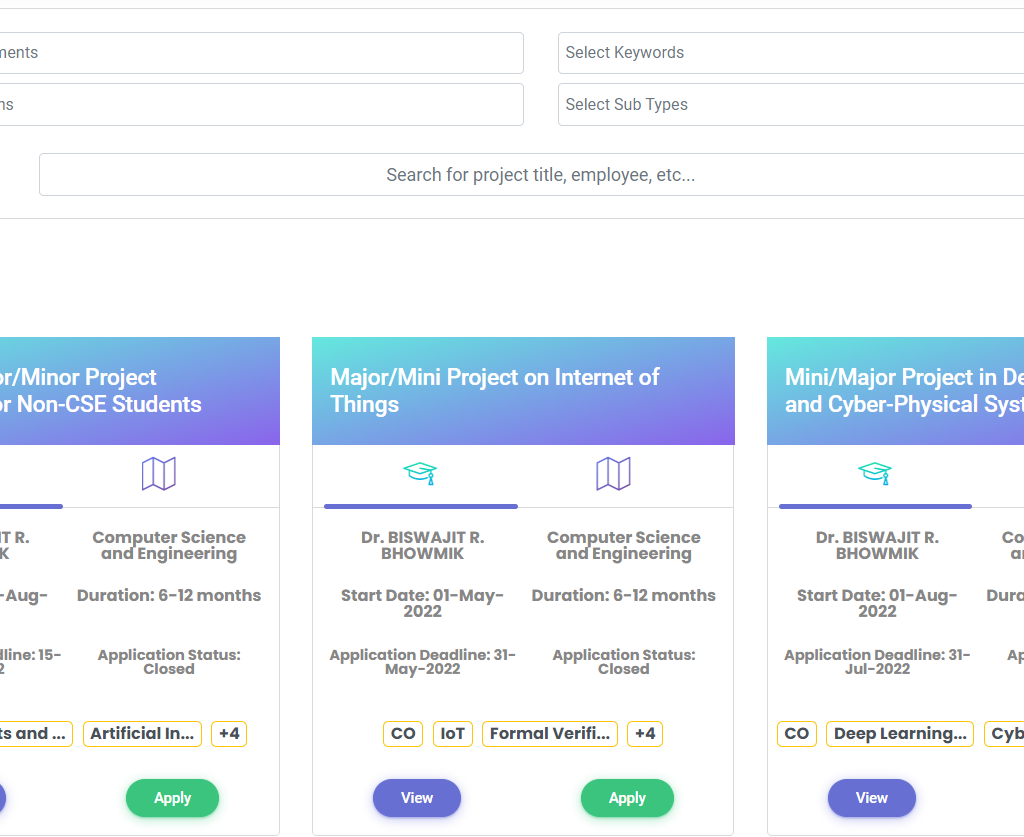
Projects Portal
The Projects Portal is the one-stop destination for students to view and apply to projects offered by the faculties.
- It can be accessed through Academics→ Projects Portal
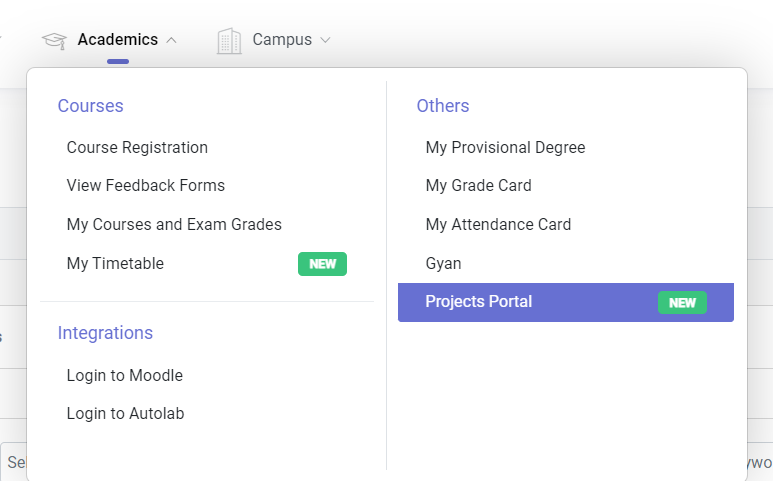
2. The Eligible Projects view shows all the projects the particular user is eligible to apply for. The eligibility criteria are decided by the Faculty who proposes the project itself and not by IRIS Team. One can filter the projects based on various criteria. The view and apply buttons on each card can be used for their respective actions.
3. A complete and more detailed guide can be found here.
IRIS Mobile App
The IRIS Mobile App is available for both Android and iOS devices and can be downloaded from the Play Store and the App Store, respectively.
The current app has loads of web features already incorporated, like:
- Course Registration
- Attendance Register
- Timetable
- Announcements
- Notifications from CDC and Academic Activities
- Grade Card
- Gyan
- Feedback Forms
- Mess Menu
- Buy and Sell
- Career Development Centre
- Calendar and Events (CEMS)
- Important Contacts
- Infrastructure Booking
- Freshers Cup
- Hostel Dashboard
The List Items in bold indicate that they are app exclusive.
A detailed guide to the app can be found here:
Download the App:
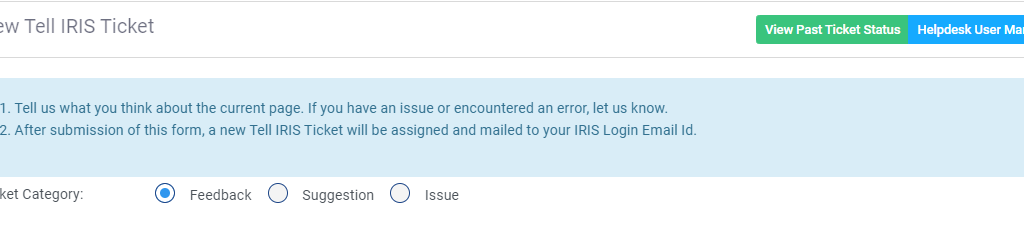
Tell IRIS
Creating a new Ticket:
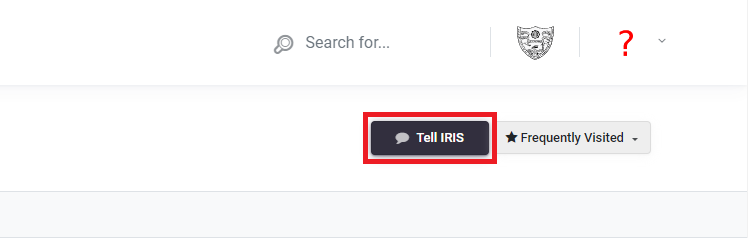
- If you have any Suggestions, Issues, or Feedback related to IRIS, head over to IRIS and click on the Tell IRIS Button on the top right side of the screen.
- A Helpdesk Ticket form will appear.
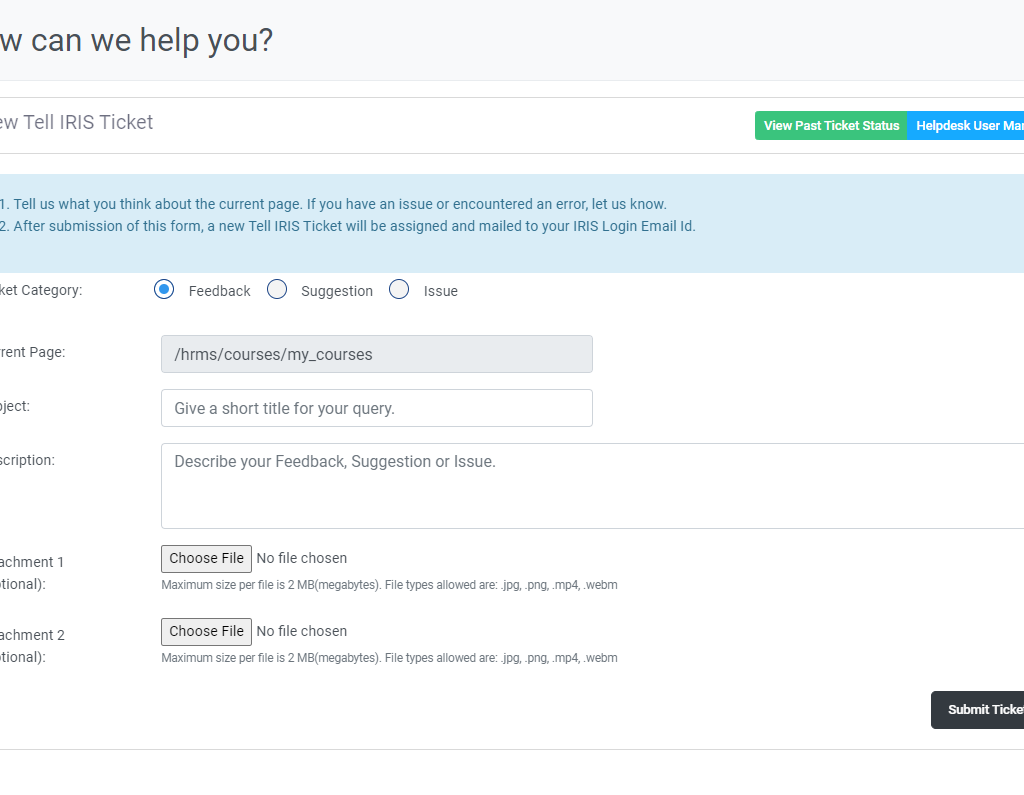
- Select one of the below categories to highlight the type of ticket:
- Issue
- Suggestion
- Feedback
- The URL of your current page will automatically get recorded.

- Give a brief and apt description of your ticket.

- You can add up to 2 attachments to better describe your ticket. Note that the maximum size of each file is 2MB. Supported extensions are .png, .jpg, .webm, .mp4.

- Click on Submit Ticket to submit your ticket. An email will be sent to the email address you use to login to IRIS. Email content will have a Ticket Tracking ID and Link to track your ticket.
To view the Status of a Past Ticket:
- To view previous tickets, click on View Past Tickets Status.

- This will open the Help Desk in a new Tab. Enter your IRIS Login Email address and Ticket Tracking ID, which was received in the email sent after submitting the ticket. Click on View Ticket.
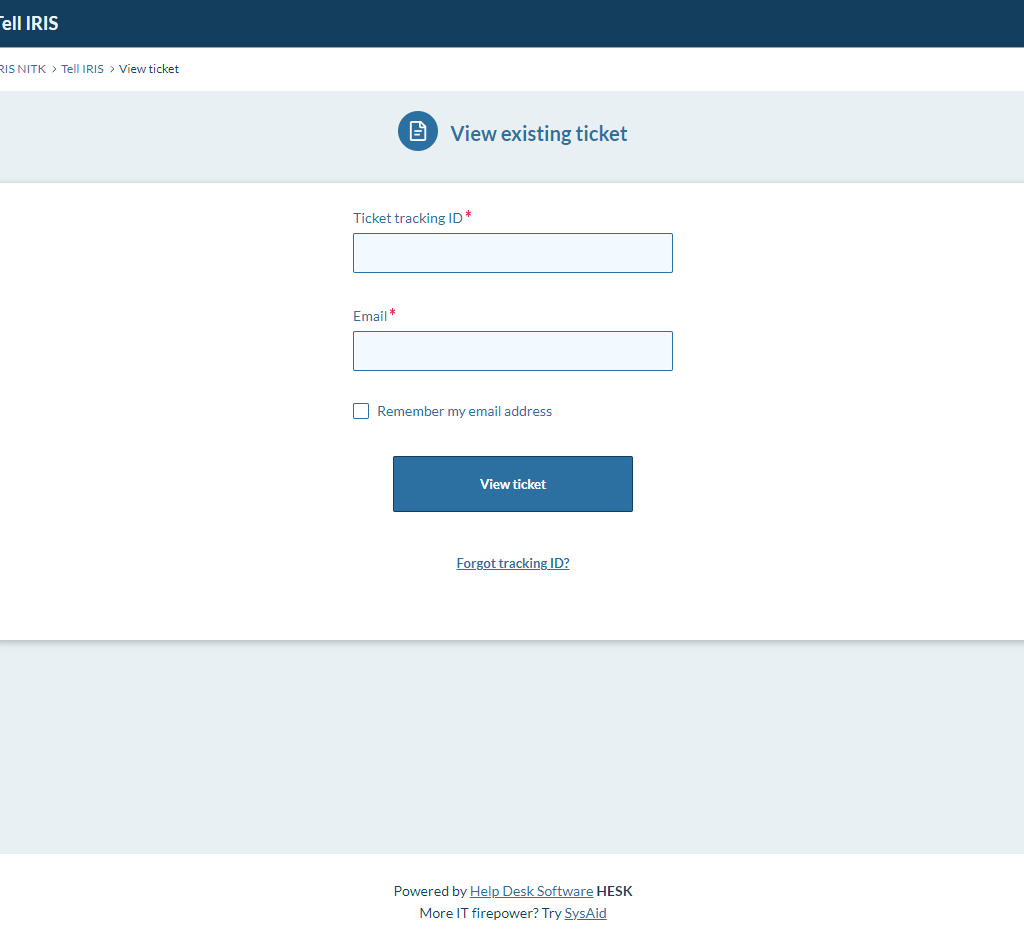
- Now, you will see any reply from Team, extend the conversation thread, and close the ticket if the issue gets resolved.
Receiving IRIS Updates
Updates regarding the IRIS portal shall be shared with users through IRIS Announcements and through IRIS Team’s social networking handles.
Know about us here and follow our Instagram, LinkedIn and Twitter handles for more updates.
FAQs
PROFILE RELATED
Q. There’s an error/change in one of the fields of my profile. What should I do?
Ans: You will have to contact the MIS Officer through their mail – misofficer@nitk.edu.in or create a ticket in Tell IRIS. Give details of your identification and which field needs changing with what new information you need. Also, give a form of proof as to why you need the change.
Q. If I want to change my details sometime in the future, am I able to do that?
Ans: Yes, you can do that. Contact the MIS Officer through their mail – misofficer@nitk.edu.in or create a Tell IRIS Ticket. Give details of your identification and which field needs changing with what new information you need. Also, give a form of proof as to why you need the change.
Q. Can any random person view my profile?
Ans: No. Only the institute authorities who are allowed this access can view it
Q. Can my data be stolen in any way?
Ans: There are privacy laws in the institute that ensure that there is no misuse of sensitive information by any entity.
Q. How to get your email id changed?
Ans: Contact MIS Officers at misofficer@nitk.edu.in or create a Tell IRIS Ticket mentioning the new email-id and the proper reason why email-id is to be changed.
Q. My Profile picture not appearing
Ans: Contact MIS Officers at misofficer@nitk.edu.in or create a Tell IRIS Ticket raising this issue. You can attach the profile picture that has to be set for your profile along with.
COURSE REGISTRATION RELATED
Q. What is course registration?
Ans: To attend the many courses/classes you will undertake, you will have to first register for the course. This course has to be approved by the respective Course Instructor and Faculty Advisor.
Q. What are the Mandatory courses, Program-specific electives?
Ans: Mandatory courses are courses that you will have to register for to satisfy your semester criteria compulsorily. Program-specific electives are courses that are exclusive to your department(e.g., Mech, IT, etc.) that you can choose to register for.
Q. Is it mandatory that I have to do my course registration online?
Ans: Yes
Q. There is a course that is not meant for me to present on my registration page. What should I do?
Ans: First, confirm with the course instructor of that particular subject whether that course exists for your class. If an error is present, contact the MIS Officer through their mail misofficer@nitk.edu.in or create a Tell IRIS ticket with your issue.
Q. I did not register for a course within the given deadline. What should I do?
Ans: Contact the particular course instructor for further instructions.
EDU ACCOUNT RELATED
Q. Do I need to create both NITK EDU and Microsoft EDU accounts?
Ans: Yes, it is mandatory.
Q. Can I use another E-Mail rather than my NITK EDU account to communicate with Faculty?
Ans: You can, but it is easier and more transparent if you were to use your NITK EDU account. Please provide all required information if using other email accounts.
Q. I already have a teams account. Do I need to create another account for teams via the Microsoft edu account?
Ans: You will have to compulsorily create a new Microsoft NITK EDU account, which subsequently leads to a new team account for attending classes.
Q. There is an existing course on MS Teams to which I have not been added despite me following the necessary steps. What should I do?
Ans: Contact your Course Instructor and explain the situation with all the necessary details. Your course Instructor will have to use the Resynchronise option available on his/her dashboard.
MOODLE RELATED
Q. Is data shared between Moodle and MS Teams?
Ans: No. They are separate entities on which you and your course instructor work on. Usually, MS Teams is used to hold live classes, whereas Moodle will often find Recorded Lectures, Assignment links, Exam links, etc.
Q. I’m not able to see an assignment link/class video (etc.) that was visible earlier. Where did it go?
Ans: Your course instructor may have removed that particular content. You can contact him/her for further details.
Q. I submitted an assignment after the deadline. Can I still submit it?
Ans: You can still submit if the link is still open. However, the fact that you uploaded after the deadline will be known by the instructor.
Q. I’m not able to play lectures on Moodle. What is the issue?
Ans: There may be some updation required for your browser (e.g., Flash player). Make sure you’re using the latest and best possible version of Chrome or Firefox.
Q. My registered courses are not appearing on my Moodle dashboard?
Ans: If your registered course has been approved by the Course Instructor and Faculty Advisor, then contact your Course Instructor and ask him/her to use the Resynchronise option available on their Course dashboard.
COURSES, MARKS, GRADES RELATED
Q. Can I view my grades without filling out feedback forms?
Ans: No. You must fill your feedback forms before viewing your grades.
Q. Are my feedback forms anonymous?
Ans: Yes
Q. There is an error in my grade. Who should I contact?
Ans: Contact your Course Instructor
Q. I’m not able to see my semester Grade Card even though I filled out my feedback forms
Ans: Make sure you fill out all the feedback forms available to you. It is also possible that a particular course’s grades have not been put up yet.
TELL IRIS RELATED
Q. What kind of issues will ‘Tell IRIS’ resolve?
Ans: Any kind of issue involving the functionality of the website itself- including error messages, the page hangs, or any other form of discrepancy will be answered for you via ‘Tell IRIS.’ IRIS is also open to hearing from you if you have any suggestions on improving the website or any interesting ideas that you may think will help the overall experience.
Q. Can IRIS act as an intermediary between Faculty and students?
Ans: No. IRIS is not involved in any form of direct interaction between students and faculty.

Herer it’s showing course registration has end on october. What should i do now?
Course registration will be available to you soon, please be patient