

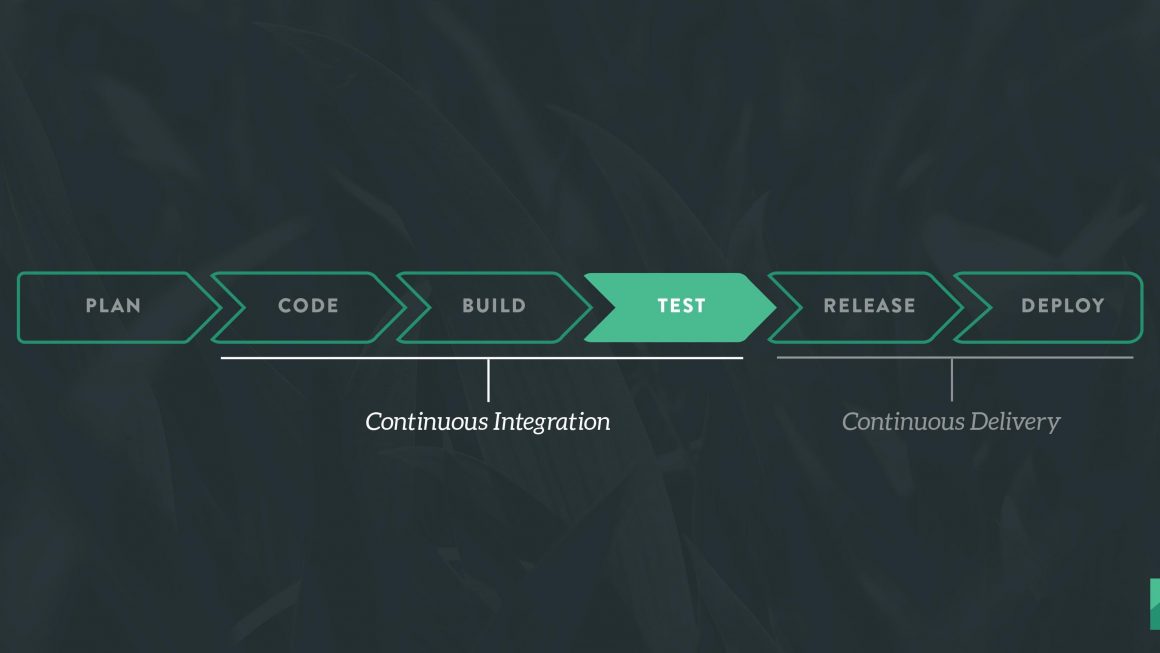
Continuous Integration is a software development practice in which you build and test software every time a developer pushes code to the application, and it happens several times a day.
Continuous Delivery is a software engineering approach in which continuous integration, automated testing, and automated deployment capabilities allow software to be developed and deployed rapidly, reliably and repeatedly with minimal human intervention. Still, the deployment to production is defined strategically and triggered manually.
Continuous Deployment is a software development practice in which every code change goes through the entire pipeline and is put into production automatically, resulting in many production deployments every day. It does everything that Continuous Delivery does, but the process is fully automated, there’s no human intervention at all.
The benefits of Continuous Integration are huge when automation plays an integral part of your workflow. GitLab comes with built-in Continuous Integration, Continuous Deployment, and Continuous Delivery support to build, test, and deploy your application.
Installing Gitlab
To install Gitlab, follow the instructions on Installation methods for Gitlab. For Ubuntu, its as simple as adding the repository and installing using apt. You can give an EXTERNAL_URL at the time of installation as the URL at which you want to access your GitLab instance. Installation will automatically configure and start GitLab at that URL.
GitLab is configured by setting the relevant options in /etc/gitlab/gitlab.rb. You can use change the external URL by adding or editing the following line in the same file:
external_url "http://gitlab.example.com"
Run sudo gitlab-ctl reconfigure for the change to take effect.
GitLab offers a continuous integration service. If you add a.gitlab-ci.ymlfile to your repository, and configure your GitLab project to use a Runner, then each commit or push, triggers your CI pipeline.
Installing and Configuring Runners
In GitLab, Runners run the jobs that you define in .gitlab-ci.yml. A Runner can be a virtual machine, a VPS, a bare-metal machine, a docker container or even a cluster of containers. GitLab and the Runners communicate through an API, so the only requirement is that the Runner’s machine has network access to the GitLab server. Runner can be specific to a certain project or serve multiple projects in GitLab.
GitLab Runner implements a number of executors that can be used to run your builds in different scenarios.
shell– executes build script on hostdocker– executes build inside docker container(s)virtualbox– executes build in a virtualbox vmparallels– executes build in a parallels vmssh– runs build on a different host via sshdocker-machine– autoscales docker machine instances and runs builds in containers across these instances
It is recommended that you use docker as the executor as it the cleanest, most common and most feature-rich.
In order to have a functional Runner you need to follow two steps:
Once the Runner has been set up, you should see it on the Runners page of your project, following Settings ➔ CI/CD
What is .gitlab-ci.yml
The .gitlab-ci.yml file is where you configure what CI does with your project. It lives in the root of your repository.
On any push to your repository, GitLab will look for the .gitlab-ci.yml file and start jobs on Runners according to the contents of the file, for that commit.
stages:
  - build
  - test
  - deploy

build_app:
  stage: build
  script:
    - ./make build

test_app:
  stage: test
  script:
    - ./make test

deploy_app:
  stage: deploy
  script:
    - scp ./app deployuser@someserver:/app
The .gitlab-ci.yml file defines sets of jobs with constraints of how and when they should be run. The jobs are defined as top-level elements with a name and always have to contain the script keyword. Jobs are used to create jobs, which are then picked by Runners and executed within the environment of the Runner.
In the example we define three build stages: build, test and deploy. The order is significant. We also define three jobs, build_app, test_app and deploy_app, which are executed in the order given by the stages to which they belong. If one build stage fails, the others will not be executed.
For full documentation of .gitlab-ci.yml, visit Configuration of your jobs with .gitlab-ci.yml
Pipeline used in the IRIS Blog
At IRIS, we use an internally hosted Gitlab instance for Version Control and Deployment. The CI/CD pipeline for the IRIS Blog runs on a locally hosted Gitlab Runner using the Docker executor.
image: ruby

stages:
  - build
  - deploy
We use the ruby docker image to run the jobs. The pipeline has two stages – build and deploy. All the jobs in the same stage are executed parallelly. Jobs of the next stage (in the order given by stages) are executed only if all the jobs of the previous stage completed running successfully.
pages:
  stage: build
  script:
    - gem install jekyll
    - bundle install
    - jekyll build -d public
  artifacts:
    paths:
      - public
Build stage has one job pages. We first install the dependencies and then build the app using jekyll build in the public folder. If there’s any error during the build, it’ll show up then and there and the pipeline will come to a halt. So this can also be considered as the testing stage. We have specified the public directory as an artifact which is attached to the job after success.
deploy:
  stage: deploy
  script:
    - curl "http://$VM_IP:5000/deploy/iris_blog/$AUTH_TOKEN"
  only:
    - master
The deploy stage has one job deploy. When this job is run, a curl request is made at the URL http://$VM_IP:5000/deploy/iris_blog/$AUTH_TOKEN. $VP_IP and $AUTH_TOKEN are Gitlab’s secret variables which can be configured in the Variables section in Settings ➔ CI/CD. This request is made to a server running on the production machine which will deploy the app after authorizing the request. The only parameter specifies that this job will run only when the triggering branch is “master”.
Deployment Server
The deployment server is a simple Flask app that is used to run the deployment script to deploy the app. We make a curl request to this server in the deploy job.
An alternate to this server is using ssh directly from .gitlab-ci.yml. But this has security risks of exposing the ssh credentials in the script or in the pipeline logs. The production system could be compromised and rendered useless. The server runs a pre-defined script, therefore even if an intruder manages to get authorized, they won’t get system access.
from flask import Flask, abort
import subprocess
app = Flask(__name__)

@app.route('/deploy/iris_blog/<string:auth_token>')
def deploy_iris_blog(auth_token):
    if not authenticate(auth_token):
        return abort(401, "Authentication Failed")
    ex = subprocess.call("cd ~/test/IRIS-Blog; git pull", shell=True)
    if ex:
        return abort(500, "Git Error")
    ex = subprocess.call("bash ~/test/IRIS-Blog/scripts/deploy.sh", shell=True)
    if ex:
        return abort(500, "Deploy Script Error")
    return "Successfull"
The request is first authenticated using the auth_token sent along with the request. Then the code base is updated using git pull to update the deploy script which is present in the git repository itself. After this is successful, the deploy script is run that will safely deploy the app. It returns an error if any of the steps fail.